The NXP i.MX8M Mini ARM Cortex-A53 processor has been widely incorporated into IPC development projects. However, ICOP has built an entire system around the i.MX8M Mini that encompasses a great build and quality product like the Panel PC and Box PC.
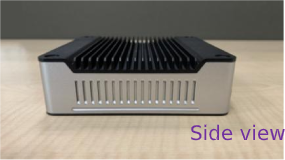
The EBOX-IMX8MM is an ARM-based EBOX offered by ICOP. that is ready to be implemented into a wide range of products. The EBOX has a line of features including being fanless, having a small footprint, and a premium aluminum cover. The EBOX also has standard VESA and DIN Rail mounting options and supports a wide temperature range from -40 to 80 °C bolstering its industrial usage options. This ARM Cortex A-53 processor features rich I/O and equipped with GPU and VPU, capable of Audio and HDMI with high-performance processing while being optimized for low-power consumption. Buyers can also select the pre-installed OS of Android 9 &Yocto Linux when placing the order.
EBOX-IMX8MM:
| System Specifications | |
|---|---|
| Processor | NXP i.MX8M Mini Quad-core 1.6 GHz ARM Cortex-A53 processor |
| Memory | 1GB to 4GB LPDDR4 onboard |
| HDMI | HDMI 1.3 (MAX.1920 x 1080 pixels) |
| Ethernet | RJ45 x2 (Intel I1210 GbE x1/CPU GbE x1) |
| USB | USB 2.0 x3 (Front x2 + Rear x1) |
| HD Audio | Mic-in & Line-out (WM8960) |
| SD card slot | SD Slot x1 (Internal slot Optional) |
| Extension I/F | 8GB to 64GB eMMC MLC/SLC onboard |
| Extension I/F | WiFi 802.11b/g/n & BT4.1 Combo 2.4G (Broadcom 43438) |
| RS-232 | D-Sub 9-pin connector x2 or x4 ports |
| RS-485 | D-Sub 9-pin connector x2 ports |
| Power requirement | DC +12V~+36V |
| Dimensions | 115 x 115 x 35mm/DIN Rail Support (Optional) |
| Net Weight | 700g |
| Operation Temperature | 0 ~ +60℃/-40 ~ +80℃ |
| Certifications | CE, FCC, VCCI |
| OS Support | Android 9, Yocto, Mainline Linux Kernel Support |
Package box dimension 240 x 220 x 170mm, includes:

EBOX-IMX8MM Diagram:
*Black aluminum cover is attached to the processor as a heatsink with the fins providing greater heat transfer.
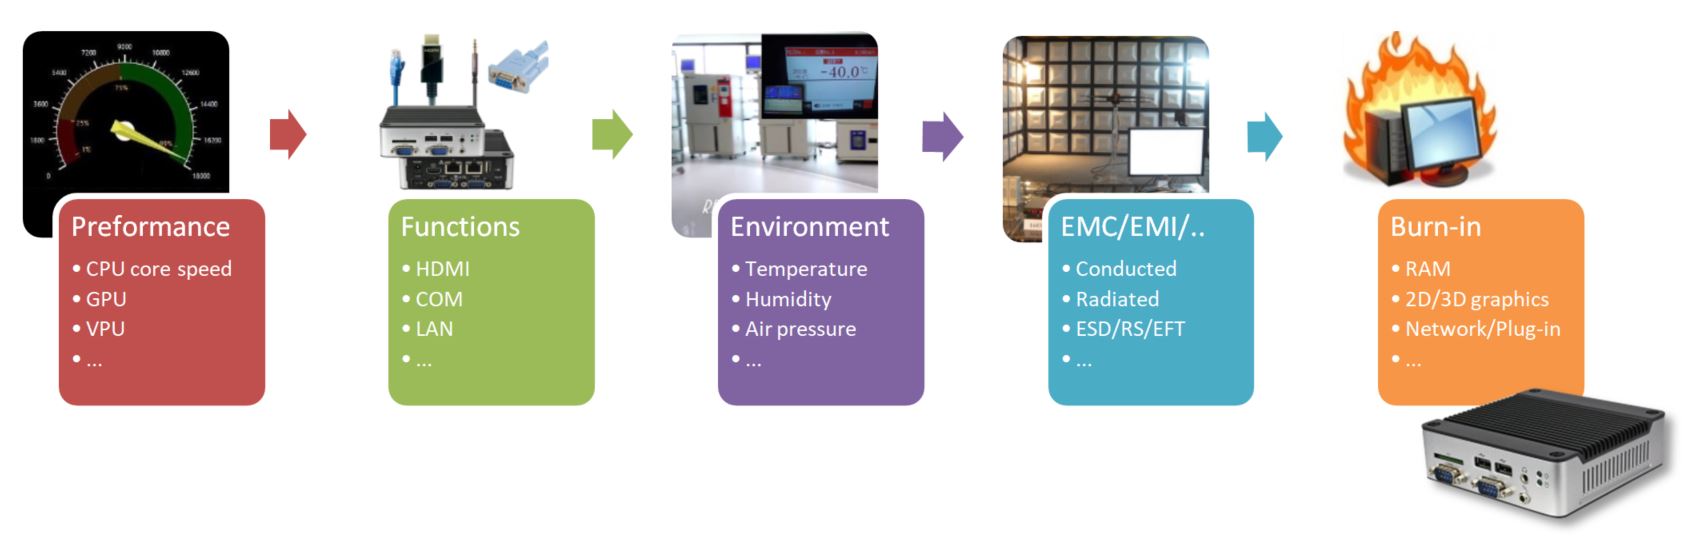
It’s been through plenty of verifications and tests to meet the highest satisfaction.
Tiny Devices, BIG Applications.


(For the detailed application info, please click the NXP applications reference link.)
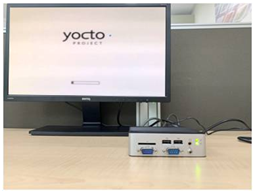
View the content below to find more information on the EBOX-IMX8MM-2G with the Yocto Linux OS.
This section will talk about the Recipe for building the Yocto Linux for EBOX-IMX8MM-2G.
Contact info@icop.com.tw for files and resources to build the Yocto Linux recipe for the EBOX-IMX8MM-2G.
You can also check the compiling method from NXP: IMXLXYOCTOUG.pdf
Suggested O/S: Ubuntu 18.04 or later.
To avoid errors while building the SDL, please refer to the local.conf.
#PACKAGECONFIG_append_pn-qemu-native = “sdl”
#PACKAGECONFIG_append_pn-nativesdk-qemu=”sdl”
Storage: Please make sure the capacity of your storage device is larger than 300GB.
RAM: Please make sure your physical memory + swap capacity is larger than 16GB.
$ sudo apt-get install gawk wget git-core diffstat unzip texinfo gcc-multilib \ build-essential chrpath socat libsdl1.2-dev
$ sudo apt-get install libsdl1.2-dev xterm sed cvs subversion coreutils texi2html \ docbook-utils python-pysqlite2 help2man make gcc g++ desktop-file-utils \ libgl1-mesa-dev libglu1-mesa-dev mercurial autoconf automake groff curl lzop \ asciidoc
$ mkdir ~/bin (this step may not be needed if the bin folder already exists)

    $ curl https://storage.googleapis.com/git-repo-downloads/repo > ~/bin/repo

    $ chmod a+x ~/bin/repo
export PATH=~/bin:$PATH
$ git config --global user.name "Your Name"

    $ git config --global user.email "Your Email"

    $ git config –list
$ mkdir imx-yocto-bsp

$ cd imx-yocto-bsp

    $ repo init -u https://source.codeaurora.org/external/imx/imx-manifest -b \ imx-linux-sumo -m imx-4.14.98-2.0.0_ga.xml

    $ repo sync
$ DISTRO=fsl-imx-xwayland MACHINE=dm395b source fsl-setup-release.sh -b \ build-dmpplease input “y” when the EULA confirmation pops out.
CORE_IMAGE_EXTRA_INSTALL += “chromium-ozone-wayland”

    IMAGE_INSTALL_append += “\

    openssh-sftp-server \

        ppp \

        rng-tools \

        glibc-gconv-utf-16 \

        expand-rootfs \

    “
BBLAYERS += “${BSPDIR}/sources/meta-custom-dmp
$ bitbake fsl-image-qt5-validation-imx
After finishing the steps above, the system will begin downloading and installing the source code, patching the file, and compiling.
After implementing bitbake fsl-image-qt5-validation-imx, an image file will be generated and stored in the file under build-dmp/tmp/deploy/images/dm395b.
In the build-dmp/tmp/deploy/images/dm395b file, the files below will be needed for image restoration.
Input command to get the image file fsl-image-qt5-validation-imx-dm395b.sdcard (In this file, there are packaged kernel and rootfs):
$ bzip2 -d fsl-mage-qt5-validation-imx-dm395b.sdcard.bz2
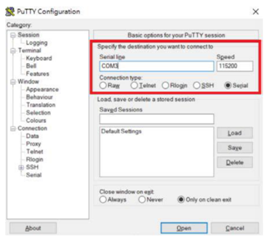
To download the UUU.auto sample, please contact info@icop.com.tw.
If you have a requirement to change the file name, please follow the steps below to change your file name (You could choose not to change the file name).
SDP: boot -f XXX.bin-flash_evk

SDPU: write -f XXX.bin-flash_evk -offset 0x57c00

SDPS: boot -f XXX.bin-flash_evk

SDPV write -f XXX.bin-flash_evk -skipspl

FB: flash bootloader XXX.bin-flash_evk

XXX.bin-flash_evk = imx-boot-dm395b-sd.bin-flash_evk


FB: flash -raw2sparse all XXX.image

XXX.image = fsl-mage-qt5-validation-imx-dm395b.sdcard
After you have set the file name, input the command below to install Yocto Linux.
uuu uuu.auto
After building the Yocto Linux and installing the image from UUU, the functions can start to be tested.
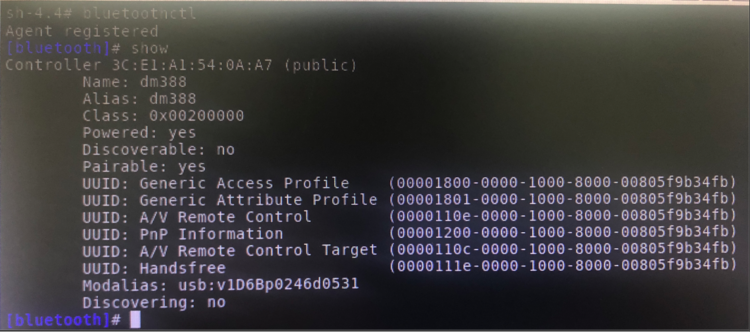
Initialized the Bluetooth module
# hciattach /dev/ttymxc0 bcm43xx 3000000 flow -t 30
Turn on the Bluetooth function controller
# bluetoothct1
Turn on Bluetooth
[bluetooth] #power on
Check the status of Bluetooth function.
[bluetooth] # show
To test Bluetooth A2DP playback, the Pulse audio control module has to be loaded. In order to simplify the operation, turn on another terminal (terminal2) and load the control module to it.
# pulseaudio –D
In the meantime, the Bluetoothctl will load more control modules. Scan Bluetooth in the terminal1.
[bluetooth] # scan on
Stop scanning after you have seen your Bluetooth device.
[bluetooth] # scan off
Connect to the Bluetooth device. (Ex: Bluetooth headphone or speaker)
[bluetooth] # connect BT-addr
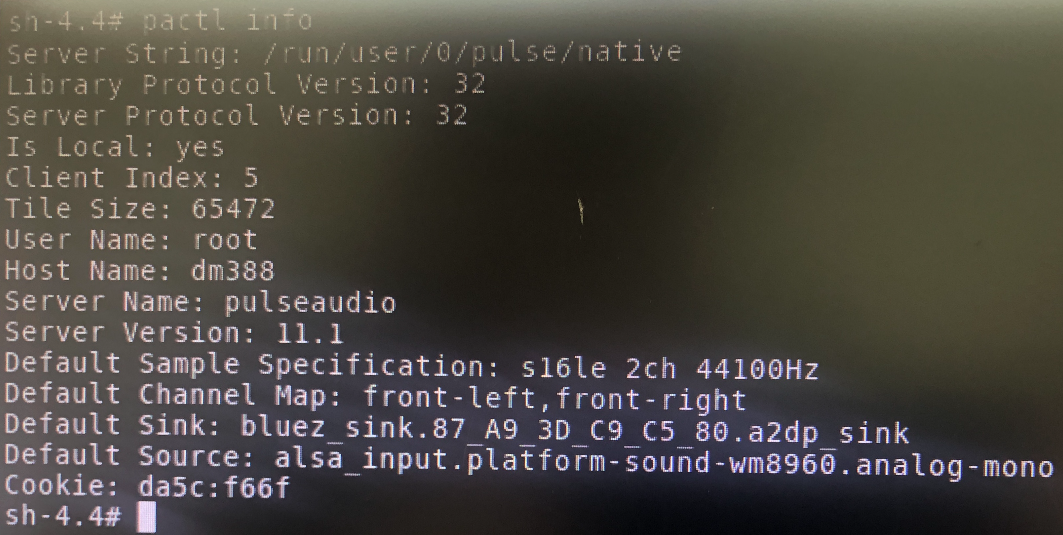
Check the terminal to see whether A2DP is supported after connecting the Bluetooth device.
# pactl info
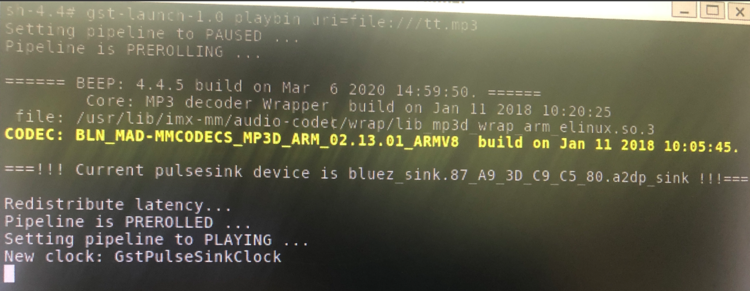
Start to play music for testing.
# gat-launch-1.0 playbin uri=file:///path
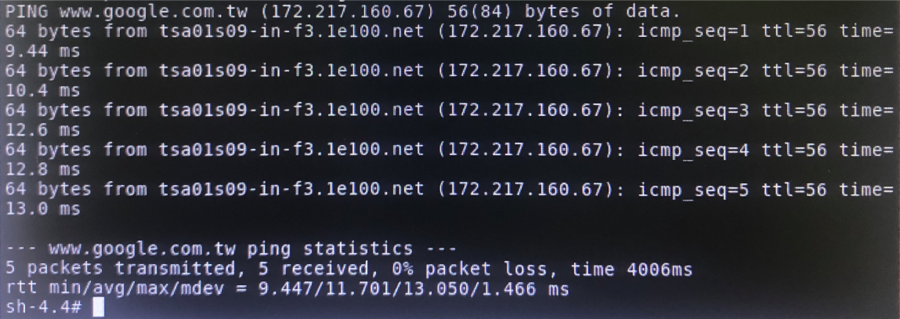
Use the PING command to test network connections.
# ping –c 10 www.google.com
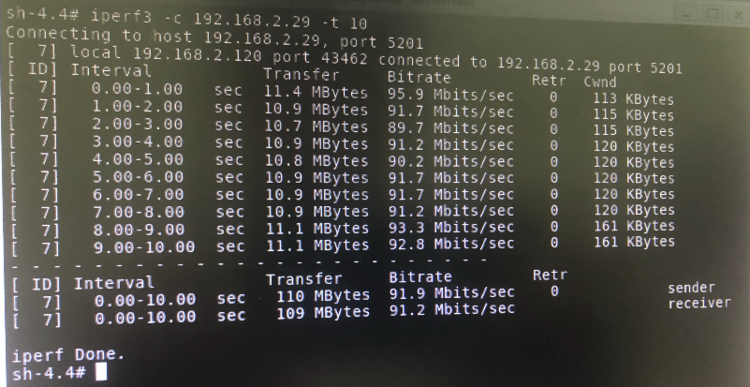
iPerf3 network bandwidth test. Normally, when testing the network by iPerf3, you will need to prepare a server-side and client-side to test the iPerf3 simultaneously.
First, start iPerf3 on the server-side.
# Server-side

# iperf3 –s
Secondly, start iPerf3 on the client-side.
# Client-side

# iperf3 –c SERVER IP
The SERVER_IP on the client-side should be set to the server-side’s IP or device name.
When iPerf3 is testing, both server-side and client-side will display the data (testing results shown below):
There are 4x UART on the EBOX-IMX8MM with default settings below:
UART1 is connected to the WLAN/Bluetooth module
UART2 is connected to the console function
UART3 is connected to the J19 connector on the board
UART3 is connected to the J21 connector on the board.
If the EBOX does not have WLAN or Bluetooth, UART1 will be connected to the J15 connector.
UART naming under Linux:
UART 1: /dev/ttymxc0
UART 2: /dev/ttymxc1
UART 3: /dev/ttymxc2
UART 4: /dev/ttymxc3
Put the UART testing tool file in the root file of Linux (Contact info@icop.com.tw for the testing tool)
Testing UART3:

# ./linux-serial-test –p /dev/ttymxc2 –o 5 –i 6 –c
Testing UART4:

# ./linux-serial-test –p /dev/ttymxc3 –o 5 –i 6 –c
To connect SSID, turn off wlan0 with the command below:
# ifconfig wlan0 down
Connect to the SSID and input the SSID password:
# iwconfig wlan0 essid “SSID” key “SSIDPASSWORD”
Turn on wlan0:
# ifconfig wlan0 up
Request IP address from DHCP server:
# udhcpc –i wlan0
Use the PING command to test network connections:
# ip=$(ifconfig wlan0 | grep “inet addr” | cut –f 1 –d B | sed ‘s/inet addr://g’);ping –c 5 S $ip www.google.com.tw
Plug in cable and use path below:
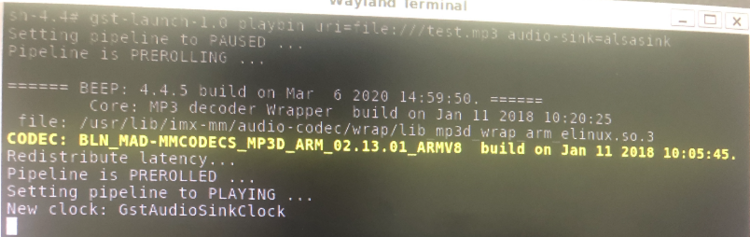
# gst-launch-1.0 playbin uri=file:///path audio-sink=alsasink
The path can be WAV, MP3, FLAC, etc.
After inputting the file, audio should be playing from Headphone or SPK-OUT.
If you need to set PCM volume (Audio decoder’s main volume), the range can be set between 0 to 127.
# amixer set Headphone 80
Plug the MIC into the MIC-IN connector and input the command below to start recording. After recording is finished, it will generate an audio file named test.wav:
# arecord –D hw:0, 0 –r 48000 –c 2 –f S16_LE test.wav
Play test.wav with the command below:
# aplay test.wav
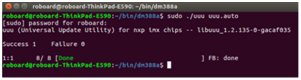
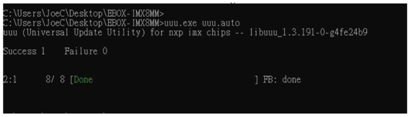
If the product cannot boot up, please use the following steps to restore Yocto Linux to the eMMC of the EBOX-IMX8MM-2G.
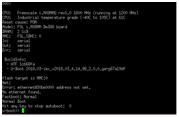
“sudo ./uuu uuu.auto“; “Wait for known USB Device to Appear”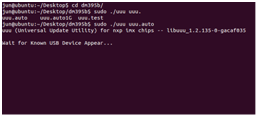


“uuu.exe uuu.auto” ; “Wait for known USB Device to Appear”.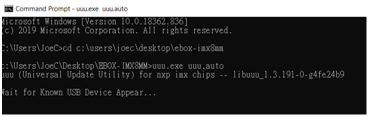
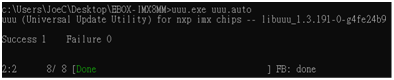
“uuu.exe uuu.auto”; “Wait for known USB Device to Appear”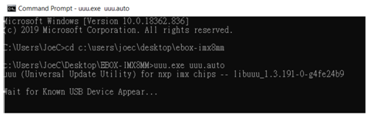
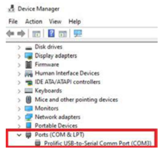
“fastboot usb0”
If you completed all the steps in the previous section, then congratulations!
Depending on what your primary interests are with the Yocto Project, you could consider any of the following: (The source of the reference link: https://www.yoctoproject.org/docs/2.4.2/yocto-project-qs/yocto-project-qs.html)
For more info and sample requests, please write to info@icop.com.tw, call your nearest ICOP Branch, or contact our Worldwide Official Distributor.